Asking for root in your Android app

Yet Another Blog

If your app needs root permissions to execute any command, you can do this using something like:

After running Runtime.getRuntime().exec(“su”) a dialog will appear to ask for permissions so the user can accept it.
What happens if you’re writing a service that will need root access anytime, even if the screen is off? The user won’t be able to accept the dialog so the app will fail.

To solve this you can do your app to ask for root permissions when it runs so, if the user accepts forever, the app will be able to run normally without asking the user anytime.
I know it’s better the user knows when an app is doing something as root but there are cases where you need to do this, for example, I’m writing an app that will disable charging for a phone when
the battery is charget at 100% in order to…

View original post 185 more words

Bubble Me, searching for an algorithm

BubbleMe was our first android application, we encounter many difficulties during it’s development.

Most of them related to memory leaks, image processing and the garbage collector. To find those memory leaks we had to use the Eclipse Memory Analizer and had to understand the inner of memory management in Android. This google IO conference was indispensable to achieve this goal. It may seem long (1 hour), but is worth it.

Image processing in android isn’t a pain in itself, but handling the images in a limited memory  is. If you are careless you will crash your app.

The algorithm

In Bubble Me we have one goal: simulate the effect of being nude through a pattern made of circles that only let us see the naked parts of a person. Here we have an example with Olivia Wilde:

Olivia Wilde Bubbled


Studying the effect on internet images we set some objectives to our algorithm:

  1. Hide all the clothes.
  2. The face must appear in the picture.
  3. The circles will never intersect; it will break the pattern.
  4. Maximize the area of the circles and it’s own size.

First approximation

The only points we had clear when we started were points 1 and 2. The other we will discover through time and many tries.

We need the user to provide where are the clothes. So we ask him to paint over.

We also need to know where are the faces so, again, we ask the user for that information. We tried to use facial recognition, but not always work.

Once we have this information we throw a big number of random points and check if it’s painted or not. If it isn’t painted we create a circle as big as possible in that location.

Later we arrange the obtained circles by size, and add the circles to the image being carefully that they don’t intersect.

Looking backwards it seem a little crazy and a waste of resources, but we need a start point.

Quadtree approximation

This image shows a quadtree of a line. From: http://cybertron.cg.tu-berlin.de/pdci11ws/gdi/

Quadtree analysis of a line

After some improvements on the previous algorithm we decided to try another approach. We decided to use QuadTrees.

Quadtrees are often use in 2D collisions (or 3D collisions if we are talking about 3D collisions), and are known for their great performance. So we supposed that would improve the generation time of the pattern. Also we discovered that the quadtree provided us very useful information to our purposes. The bigger areas were where we should place our circles.

To increase even more the cover area we slightly (and iteratively) moved the circles to maximize the occupied space.

The performance improvement was great, and we decided to stick to this algorithm.

Other algorithm: Delaunay triangulation  and Voronoi cells


Delaunay triangulation (black) and Vornoi cells (red)

Delaunay and Voronoi

Beside of using quadtrees for the algorithm we think there are event faster ways of creating the pattern.  Using Delanuay and Voronoi (they are correlated).

Finding the Delaunay triangulation it’s even faster than calculate the quadtree for the image. And the points of the triangulation would be the center of our circles in the pattern.

There are several implementations in the net of this algorithms, so that wouldn’t be a problem. Maybe the hardest part would be to represent the clothes as unwanted zones, and for that we keep the quadtree implementation.


Custom ImageView with Zoom and Drag

I have made a custom ImageView that allows you to zoom in and out, and drag the window. The code is hosted in bitbucket: https://bitbucket.org/jewinaruto/zoomimage

Download  the apk corresponding to the video.

I tried to allow the user to customize the image as much as possible, so there are several custom parameters to configure in the xml. This are the things you can configure:

  • Adjust the image fit. If you disable this you can move or zoom the image as you want (Attr: adjustToBounds).
  • Block the image in the middle when it’s not occupying all the view (Google Pictures like). (Attr: blockImageInTheMidleWhileIsSmallerThanView)
  • Not allow the image never surpass the limits. If you let the image surpass the limits it will be like QuickPick (like the top video), if not it will be like Google Pictures or Google+ (like the video below). (Attr: allowExcedLimitsWhenMovingImage)
  • Double click to adjust image to center, or zoom in. You can enable it or no (Attr: doubleClickAdjust), set the maximum time to make a double click (Attr: doubleClickTimeInMillis), or set the zoom level double clicking by second time (Attr: doubleClickZoomLevel).
  • Configure the zoom levels. They are relative to the initial position of the view.(Attr: mininumZoomLevel & maximumZoomLevel). You can make this values relative to the size of the Image (Attr: isMinimumZoomLevelRelativeToView && isMaximumZoomLevelRelativeToView)

Download  the apk corresponding to the video.

Here is the code for the parameters:


Parsing the attributes:

private void parseAttributes(Context context, AttributeSet attrs) {
    TypedArray a = context.getTheme().obtainStyledAttributes(
            attrs, R.styleable.ZoomImageView, 0, 0);
    try {
        maxZoomLevel = a.getFloat(R.styleable.ZoomImageView_maximumZoomLevel, 3f);
        minZoomLevel = a.getFloat(R.styleable.ZoomImageView_mininumZoomLevel, 1f);
        doubleClickZoomLevel = a.getFloat(R.styleable.ZoomImageView_doubleClickZoomLevel, 2f);
        isMaxZoomLevelRelative = a.getBoolean(R.styleable.ZoomImageView_isMaximumZoomLevelRelativeToView, true);
        isMinZoomLevelRelative = a.getBoolean(R.styleable.ZoomImageView_isMinimumZoomLevelRelativeToView, true);
        adjustToBounds = a.getBoolean(R.styleable.ZoomImageView_adjustToBounds, true);
        doubleClickAdjust = a.getBoolean(R.styleable.ZoomImageView_doubleClickAdjust, true);
        allowExcedLimitsWhenMovingImage = a.getBoolean(R.styleable.ZoomImageView_allowExcedLimitsWhenMovingImage, false);
        blockImageInTheMiddle = a.getBoolean(R.styleable.ZoomImageView_blockImageInTheMidleWhileIsSmallerThanView, true);
        doubleClickTimeInMillis = a.getInteger(R.styleable.ZoomImageView_doubleClickTimeInMillis, 250);
    } finally {
        a.recycle();
    }
}

And here we have an example of how to configure the image view (this was the configuration for the second video).


The code is too extend to put it in the post, but bassically you have to extend an ImageView and set it an onTouch listener.

Here you have the code for the custom imageview. This fragment shows you the onTouch method.

@Override
public boolean onTouch(View view, MotionEvent event) {
    if (!areValuesInitialized){
        initializeValues();
    }
    if (mode == CENTERING_IMAGE){
        return true;
    }

    switch (event.getAction() & MotionEvent.ACTION_MASK) {
        case MotionEvent.ACTION_DOWN:
            savedMatrix.set(matrix);
            start.set(event.getX(), event.getY());
            mode = DRAG;
            break;
        case MotionEvent.ACTION_POINTER_DOWN:
            oldDistance = spacing(event);
            if (oldDistance > 10f) {
                savedMatrix.set(matrix);
                midPoint(mid, event);
                mode = ZOOM;
            }
            break;
        case MotionEvent.ACTION_UP:
            checkClick(event);
            if (mode != CENTERING_IMAGE){
                postAdjust();
            }
        case MotionEvent.ACTION_POINTER_UP:
            setModeToNoneIfNotAdjustingOrCenteringView();
            break;
        case MotionEvent.ACTION_MOVE:
            if (mode == DRAG) {
                moveImage(event);
            } else if (mode == ZOOM) {
                scaleImage(event);
            }
            preAdjust();
            break;
    }

    return true;
}

To move and scale the images we use matrix.

In this case we use a 3×3 matrix, for this example we can use this as a reference:

|f0 f1 f2|
|f3 f4 f5|
|f6 f7 f8|

This are the corresponding values:

  • f0 -> x scale value
  • f2 -> x position value
  • f4 -> y scale value
  • f5 -> y position value

For this example the x scale value will always be equal to y scale value.

To adjust the image with an animation I use a Runnable and an Interpolator, I took the idea from here.

private void interpolateMatrixToValue(final float destinyMatrixValues[]){
    final float originMatrixValues[] = new float[9];
    matrix.getValues(originMatrixValues);

    final Interpolator interpolator = new AccelerateDecelerateInterpolator();
    final long startTime = System.currentTimeMillis();
    final long duration = 400;
    post(new Runnable() {
        @Override
        public void run() {
            float tempMatrix[] = new float[9];

            float t = (float) (System.currentTimeMillis() - startTime) / duration;
            t = t > 1.0f ? 1.0f : t;
            float interpolatedRatio = interpolator.getInterpolation(t);

            for (int i = 0; i < 9; i++){
                tempMatrix[i] =
                        originMatrixValues[i] +
                                interpolatedRatio * (destinyMatrixValues[i] - originMatrixValues[i]);
            }

            matrix.setValues(tempMatrix);
            setImageMatrix(matrix);
            if ((t < 1f) && ((mode == ADJUSTING) || mode == CENTERING_IMAGE)) {
                post(this);
            } else {
                if ((mode == CENTERING_IMAGE) || (mode == ADJUSTING)) {
                    mode = NONE;
                }
            }
        }
    });
}

In the future I want to add kinetic scrolling and transform this code into a library.

Image slider with parallax effect (FlickR style)

In this post we will see how to make an image slider with parallax effect. You can download the code, and the apk: normal, flickR style.

First I will explain how to achieve this effect without copying the FlickR layout. This is what we will make:

ParallaxImageSliderSimple

Fast resume: we will create a ViewPager in the MainActivity and attach it an OnPageChangeListener, then in the onPageScrolled method add the parallax effect.

These are the elements of our project:

Layout

Main activity layout


Page adapter element layout:


We define the ImageView in a FrameLayout to keep the image inside and not to overlap the other images when applying the parallax effect.

Code

We will start defining the ViewPage adapter. Inside it we will override the intantiateItem method to inflate our layout and attach the image.

public class ImagePageAdapter extends PagerAdapter {
    private final Activity activity;
    private int[] imagesId;
    Map imageViews = new HashMap();

    public ImagePageAdapter(Activity activity, int[] imagesId) {
        this.activity = activity;
        this.imagesId = imagesId;
    }

    public Map getImageViews() {
        return imageViews;
    }

    @Override
    public int getCount() {
        return imagesId.length;
    }

    public boolean isViewFromObject(View view, Object object) {
        return view == object;
    }

    @Override
    public Object instantiateItem(ViewGroup container, int position) {
        LayoutInflater inflater = activity.getLayoutInflater();

        View view = inflater.inflate(R.layout.page_adapter_element, null);
        ImageView imageView = (ImageView) view.findViewById(R.id.image);
        imageView.setImageResource(imagesId[position]);
        container.addView(view);
        imageViews.put(position, imageView);
        return view;
    }

    @Override
    public void destroyItem(ViewGroup container, int position, Object object) {
        container.removeView((FrameLayout) object);
    }

}

We have defined the field imageViews that saves the position and the view of the image. We will access this field later from the MainActivity to get the views and apply the parallax effect.

Saving the views at this point improves the performance due to we don’t have to search for them lather.

Now we will analyze the MainActivity code:

public class MainActivity extends ActionBarActivity implements ViewPager.OnPageChangeListener {
    int[] pictures = new int[]{
            R.drawable.picture_1,
            R.drawable.picture_2,
            R.drawable.picture_3,
            R.drawable.picture_4,
            R.drawable.picture_5,
            R.drawable.picture_6
    };

    private int width;
    ViewPager viewPager;
    private ImagePageAdapter adapter;

    @Override
    protected void onCreate(Bundle savedInstanceState) {
        super.onCreate(savedInstanceState);
        setContentView(R.layout.activity_main);

        initViewPagerAndSetAdapter();
        calculateWidth();
    }

    private void initViewPagerAndSetAdapter(){
        viewPager = (ViewPager) findViewById(R.id.parallaxSlider);
        adapter = new ImagePageAdapter(this, pictures);
        viewPager.setAdapter(adapter);

        addPageChangeListenerIfSDKAbove11();
    }

    private void addPageChangeListenerIfSDKAbove11() {
        if (Build.VERSION.SDK_INT >11) {
            viewPager.setOnPageChangeListener(this);
        }
    }

    private void calculateWidth() {
        Display display = getWindowManager().getDefaultDisplay();
        Point size = new Point();
        viewPager.getWidth();

        if (Build.VERSION.SDK_INT <13) {
            width = display.getWidth();
        } else {
            display.getSize(size);
            width = size.x;
        }
    }

    @Override
    public void onPageScrolled(int position, float positionOffset, int positionOffsetPixels) {
        parallaxImages(position, positionOffsetPixels);
    }

    private void parallaxImages(int position, int positionOffsetPixels) {
        Map imageViews = adapter.getImageViews();

        for (Map.Entry entry: imageViews.entrySet()){
            int imagePosition = entry.getKey();
            int correctedPosition = imagePosition - position;
            int displace = -(correctedPosition * width/2)+ (positionOffsetPixels / 2);

            View view = entry.getValue();
            view.setX(displace);
        }
    }

    @Override
    public void onPageSelected(int position) {

    }

    @Override
    public void onPageScrollStateChanged(int state) {

    }
}

We set the content view, init the view pager, set the onPageChangeListener and finally calculate the width of the screen (because we will need it to make the parallax effect).

As we can see we don’t do nothing to complicated, all the “magic” its done in the parallaxImages method.

The parallax effect

First we will see how is the effect we want to achieve, and later we will recheck the code again.

In an view pager the positions of the views are assigned from 0 to N in order. In the onPageScrolled method the position parameter indicates the view that is more to the left in the Screen. Here we can see the values for that parameter in function of the screen position (the black rectangle). The orange squares are the views.

Position in viewpager

In this image (click to full size) we can see the starting and end position of the first images (position 0 and 1), and its correlation with the code.

Parallax Effect Explained

private void parallaxImages(int position, int positionOffsetPixels) {
    Map imageViews = adapter.getImageViews();
    for (Map.Entry entry: imageViews.entrySet()){
        int imagePosition = entry.getKey();
        int correctedPosition = imagePosition - position;
        int displace = -(correctedPosition * width/2)+ (positionOffsetPixels / 2);

        View view = entry.getValue();
        view.setX(displace);
    }
}

On this method we process all the views we saved (in the instantiate method) adjusting the X.

Custom layouts, FlickR like layout example

Once you get this point is easy to customize your layouts. For example I will change the layout to have the slider similar to the flickR.

FlickR like layout

Here are the new layout files:

Lets see the viewpager layout first:


The only differences are that now we want to match the parent size, and we add a small padding to the sides to the FrameLayout.

Now lets see the MainActivity layout:


In this case:

  • I set the height of the ViewPager to match parent height.
  • I added a view on top of the view pager with a gradient from grey to transparent and white text in top. This way we can read the text even with a bright images.

Parallax Image Slider FlickR like landscape

Here is the code for the gradient:


You can check the code at bitbucket, in the flickRLike branch.

Custom header with parallax effect in ListView

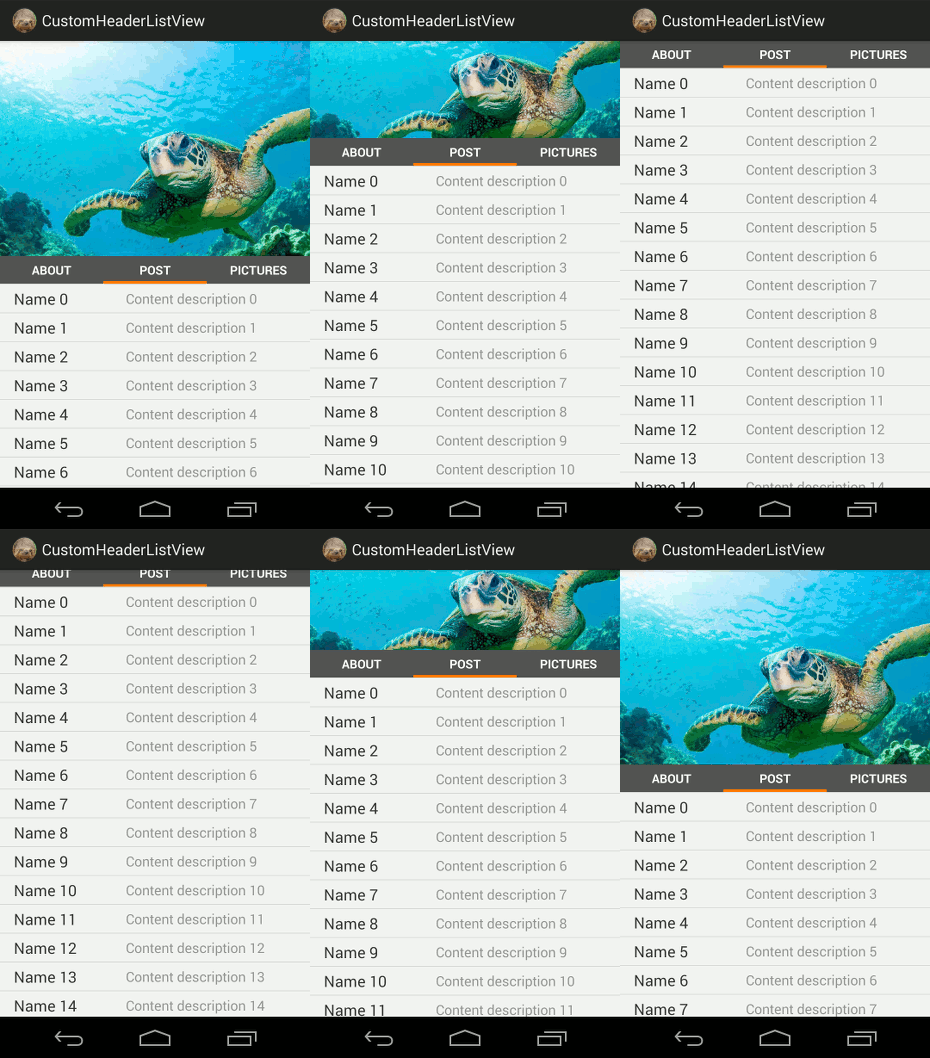
We will see how to set a custom header to our ListView and apply a parallax effect to the header image.

You can download the example code and the apk.

Parallax effect

Here is the custom header I use:

Custom header

You can check the layout files:

The main layout is a ListView, and we define the element layout in its own xml.

Each element of the ListView will represent a Model. For the example I use a basic model that has a name and a description.

public class Model {
    private String name;
    private String description;

    public Model(String name, String description) {
        this.name = name;
        this.description = description;
    }

    public String getName() {
        return name;
    }

    public void setName(String name) {
        this.name = name;
    }

    public String getDescription() {
        return description;
    }

    public void setDescription(String description) {
        this.description = description;
    }
}

We also have to define an adapter for that model.

public class ModelAdapter extends SlothArrayAdapter {

    @InjectView(R.id.name)          TextView name;
    @InjectView(R.id.description)   TextView description;

    public ModelAdapter(Context mContext, int layoutResourceId, List data) {
        super(mContext, layoutResourceId, data);
    }

    @Override
    protected void onCreateViewForPosition(View viewCreated, int position, Model data) {
        name.setText(data.getName());
        description.setText(data.getDescription());
    }
}

I’m using a custom array adapter from slothframework. That way I can use view injection and two custom methods onCreateViewForPosition and onCreatingLastView.
The view injection it’s not done unnecessarily, I’ve tried to implement some kind of ViewHolder pattern[performance tips for android’s ListViews].

Of course you can have your own adapter.

Now we will analyze the code of the MainActivity. The first thing we do is initialize the adapter and set it to the view.

@Override
protected void onCreate(Bundle savedInstanceState) {
    super.onCreate(savedInstanceState);
    setContentView(R.layout.activity_main);

    initAdapter();
    ...
}

private void initAdapter() {
    // instantiate the adapter and attach it to the listview
    adapter = new ModelAdapter(this, R.layout.element_list_view, modelList);
    listView.setAdapter(adapter);
}

We inflate and set the custom header:

@Override
protected void onCreate(Bundle savedInstanceState) {
    ...
    inflateHeader();
    ...
}
...
private void inflateHeader() {
    // inflate custom header and attach it to the list
    LayoutInflater inflater = getLayoutInflater();
    ViewGroup header = (ViewGroup)inflater.inflate(R.layout.custom_header, listView, false);
    listView.addHeaderView(header, null, false);

    // we take the background image and button reference from the header
    backgroundImage = (ImageView) header.findViewById(R.id.customHeaderBackground);
    postButton  = (Button) header.findViewById(R.id.postsButton);
}

Parallax effect

There are other ways to get the parallax effect, but here we will see a very simple one. By now this parallax effect is for api level 11 and above (Android 3.0).

Our ListView must have its custom ScrollListener, so we add it in the onCreate method of our MainActivity. We only add it to devices with api level 11 and above for compatibility.

@Override
protected void onCreate(Bundle savedInstanceState) {
    ...
    addScrollListenerForSDKsAbove11();
    ...
}

private void addScrollListenerForSDKsAbove11() {
    if (Integer.valueOf(Build.VERSION.SDK_INT)>11) {
        listView.setOnScrollListener(this);
    }
}

We must override the onScroll method and set the top of the image to its middle value:

// override the OnScrollListener methods: onScrollStateChanged & onScroll
@Override
public void onScrollStateChanged(AbsListView absListView, int i) {}

@Override
public void onScroll(AbsListView absListView, int i, int i2, int i3) {
    parallaxImage(backgroundImage);
}

private void parallaxImage(View view) {
    Rect rect = new Rect();
    view.getLocalVisibleRect(rect);
    if (lastTopValueAssigned != rect.top){
        lastTopValueAssigned = rect.top;
        view.setY((float) (rect.top/2.0));
    }
}

The effect is done in the parallaxImage method, when we call view.setY. Here we are displacing the view down half the size that the view goes up. For each 2 pixels that the view goes up the screen we displace the view 1 pixel down.

To avoid calling view.setY() unnecessarily we had defined a field to check if the value has changed (lastTopValueAssigned)

Here are the code references again:

Background image

Implementing view injection, SlothFramework

So… I tried to make a Framework, I call it SlothFramework. But I consider it more of an experiment.

While I was developing my last app I decided that I wanted to get rid of as much boilerplate code as I could. So I started a package where I was putting all that code. With time that package become a library and now I’m sharing it with you.

It’s in a clearly alpha (pre-alpha?) state so don’t be too hard on me, but I will be pleased to hear suggestions and (constructive) critics.

For now I present you two of it’s main features, but I will only analyse the view injection:

  • Inject views
  • Save the state of a field to keep its value when you rotate your device.

Implementing view injection

The view injection it’s done through a custom annotation @InjectView, that has for parameter the id of the view. It’s done in a similar way to roboguice.

View injection example:

    @InjectView(R.id.breadCrum)   ListView breadCrumList;
    @InjectView(R.id.list_layout) ImageButton changeToList;
    @InjectView(R.id.context_bar) RelativeLayout contextBar;
    @InjectView(R.id.edit)        ImageButton edit;
    @InjectView(R.id.searchText)  EditText searchText;

It’s quite few code the necessary to implement view injection. Basically there are 3 parts:

  • Annotation: To mark the fields to process and pass the view id as parameter.
  • Base classes: To process the annotations in the activities and the fragments.
  • View injector: the one who injects the view. Implementing an injector helps to avoid code replication on base classes.

Annotation

First we need to define the annotation:

package es.slothdevelopers.slothframework.annotations;

import java.lang.annotation.ElementType;
import java.lang.annotation.Retention;
import java.lang.annotation.RetentionPolicy;
import java.lang.annotation.Target;

@Target(ElementType.FIELD)
@Retention(RetentionPolicy.RUNTIME)
public @interface InjectView {
    int value() default Integer.MIN_VALUE;
}

Base classes

In order to process this annotations and inject the views our classes must extend an Sloth Class (depending if it’s an activity or a fragment).

Here you can check the available classes: available classes.

The view injection is made in different points depending of the base class. This is because the views are consolidated in different forms depending if it’s an activity or a fragment.

Activities

Here we have the code related to view injection for an Activity (SlothActivity)class:

public class SlothActivity extends Activity {
    ViewInjector viewInjector = new ViewInjector(this);

    public SlothActivity(){
        parseFields();
    }

    // HERE WE PROCESS THE ANNOTATION
    private void parseFields() {
        for (Field field : this.getClass().getDeclaredFields()) {
            field.setAccessible(true);
            viewInjector.checkIfViewToInject(field);
        }
    }
...
    // AND WE OVERRIDE SETCONTENTVIEW TO INJECT THE VIEWS
    @Override
    public void setContentView(int layoutResID) {
        super.setContentView(layoutResID);
        viewInjector.injectViewList(this);
    }
}

In the constructor we parse fields to check the annotations, saving the fields we would inject later.

Then we override the setContentView method (in the Sloth class) to inject the views at this point. It’s made this way because is in this method where we have our view for the first time in the activity.

Fragments

For the fragments (bases on SlothFragment) we inject the views in the onViewCreated method:

@Override
public void onViewCreated(View view, Bundle savedInstanceState) {
    super.onViewCreated(view, savedInstanceState);
    viewInjector.injectViewList(view);
}

In resume: depending the class you are extending you would have access to the injected views on different points.

  • If you are extending an Activity class you could use the injected views after calling the setContentView method.
  • If you are extending a Fragment class you could use the injected views after calling the super method on onViewCreated.

View Injector

And here we have the code for the injector:

public class ViewInjector {
    List viewsToInject = new LinkedList();
    SlothLog log;
    Object caller;

    public ViewInjector(Object caller){
        this.log = new SlothLog(caller);
        this.caller = caller;
    }

    public void checkIfViewToInject(Field field) {
        if (field.isAnnotationPresent(InjectView.class)){
            viewsToInject.add(field);
        }
    }

    public void injectViewList(Activity activity) {
        for (Field field: viewsToInject){
            injectView(activity, field);
        }
    }

    private void injectView(Activity activity, Field field) {
        int id = field.getAnnotation(InjectView.class).value();
        if (id == Integer.MIN_VALUE){
            log.debug(errorObtainingViewIdToInject(field));
        }
        try {
            field.set(caller, activity.findViewById(id));
        } catch (IllegalAccessException e) {
            log.error(errorInjectingView(field, activity.getResources()));
        } catch (IllegalArgumentException ex){
            log.error(errorInjectingView(field, activity.getResources()));
        }
    }
}

As we can see it basically save the fields to be injected in a List and inject the views on demand. The view injection is done in this line:

field.set(caller, activity.findViewById(id));

Notifying errors

I tried to advise some typical errors injecting view. One of them is try to inject a different type that the one you declared.

In this example I’m trying to inject a ListView in a FrameLayout.

***********************************************************************
Error injecting view in: MainActivity.
It's possible that the type you are trying to inject differs from the one declared in the layout.
Check code.
@InjectView(R.id.list)
FrameLayout listView;
***********************************************************************

Saving the state of a field, @SaveState annotation

This annotation can be used in simple fields (primitive data types, POJOs, and list) to save the state of the field when we pause our activity and restore it when we resume it.

To use the annotation you must simply add the @SaveState annotation, no parameters needed.

Example:

    @SaveState    boolean waitingForRestartGame = false;
    @SaveState    int punctuation = 0;

This annotation can be used in Fragments and Activities.

I will post about this annotation with more time in future posts, but you can check the repository if you want to see how it’s done.

The process it’s similar to the inject view, it involves an annotation, the base classes and the save state injector.

The type support its not complete(I’ll try to make a list), there is still some work to do, and how you can see, it involves Reflection.

Example project

To show the framework in action I made a very simple project.

It consist of a button and a counter. Each time you press the button the counter grows.

Example application

The views are injected automatically. In this example we are injecting the Button and the TextView of the counter with the @InjectView annotation.

We are also saving the state of the counter with the @SaveState annotation. Without the annotation your counter will go down to 0 each time you rotate your device. You could write the code to restore the state, but the main point of the framework is not to do so.

Here is the resulting code of the main activity:

public class MainActivity extends SlothActionBarActivity implements View.OnClickListener {
    @SaveState
    int counter = 0;

    @InjectView(R.id.counter)       TextView counterCount;
    @InjectView(R.id.increaseCount) Button increaseCount;

    @Override
    protected void onCreate(Bundle savedInstanceState) {
        super.onCreate(savedInstanceState);
        setContentView(R.layout.activity_main);
        increaseCount.setOnClickListener(this);
    }

    @Override
    public void onClick(View view) {
        counter++;
        updateCounterCount();
    }

    @Override
    protected void onResume() {
        super.onResume();
        updateCounterCount();
    }

    private void updateCounterCount(){
        counterCount.setText(String.valueOf(counter));
    }
}

You can check the rest of the code in the repository:

That’s all by now. I’ll present more features in future posts.

Thanks for reading.

Sloth logo 3

Shadow effect with custom shapes

It’s easy to create a shadow for your views using custom shapes.

The idea it’s that you create the shadow layer as background first and the content layers on top of that.
But you also need to displace the layers in order to create the shadow effect.

For example:


                <!-- SHADOW LAYER -->
            
            
                <!-- CONTENT LAYER-->


You can control the shadow direction and size through the top, bottom, right and left parameters.

Shadow shapes

Here we have an example of our app WhoSaid:

Custom shadow shape


            <!-- SHADOW LAYER -->


            <!-- CONTENT LAYER -->


In our case we take off the shadow when the button is pressed to give improve the feedback.

Don’t forget that you can play with distance and colors to get new effects. For example you can use a gradient for the shadow layer.

Using “animation layers” to build complex bitmaps animations in Android

For the android game WhoSaid we wanted to animate a character reading (we call it Will). But we wanted it to appear completely random.

will

We wanted the character to move the eyebrows, the eyes and the mouth separately. But the number of combinations were too high (120 frames), making almost impossible not to crash the app, and complicating the xml for the animation.

So we decided to divide the character into three “animation layers”: body + eyebrows (3 frames), eyes (5 frames) and mouth (8 frames). 16 frames in total, but this way we have 120 combinations.

Layout configuration

So we figured out who to do it minimizing the number of images. We used a FrameLayout as container of the layers. And each animation layer is an ImageView.

In the layout file we must include a FrameLayout where we are going to put the ImageViews. In this case we have three ImageViews, one for the eyebrows animation , other for the eyes animation and the last for the mouth animation.

The order of the ImageViews is important. The first ImageView is the base, and the later views are in top of that in descending order. In this case the base goes first, and later the eyes view.

Here is the layout file:


<!--Container of the three layers-->


    <!--First layer -&gt; Base layer-->
    

    <!--Second layer-->
    

    <!--Third layer -&gt; Top layer-->
    

Don’t forget to set the src property of your ImageViews to a transparent bitmap of the same size of your frames. If not the images of the animation will stretch to occupy all the view without maintaining proportions.

Drawable configuration

First of all, all the frames must be the same size.

Frame sizes must be equals.

Frame sizes must be equals.

And now the configuration for the three layers.

First layer (base layer)

Here we have the tree images that compound our base animation layer.

Eyebrows animation.

Base image with the three frames that compose the eyebrows animation.

With this three images we create an animation drawable:


Second layer, eyes animation

And in top of that we will set our eyes animation, composed by five frames.

Frames that compose the eyes animation.

Frames that compose the eyes animation.

And the xml for this animation:


Third layer, mouth

Frames that compound the mouth animation. I show you as a gif because there are 8 frames.

Mouth animation

And here we have the animation xml:


You will notice that there are repeated drawables. That not increase the memory that the animation occupy, but it gives a more variety animation.

Code configuration

And last but not least we have to code our animation.

private void animateWill() {
    ImageView willBase = (ImageView) getView().findViewById(R.id.willBase);
    willBase.setAdjustViewBounds(true);
    willBase.setBackgroundResource(R.drawable.will_base_eyebrows_animation);
    AnimationDrawable eyebrowsAnimation =(AnimationDrawable) willBase.getBackground();
    eyebrowsAnimation.start();

    ImageView willEyes = (ImageView) getView().findViewById(R.id.willEyes);
    willEyes.setAdjustViewBounds(true);
    willEyes.setBackgroundResource(R.drawable.will_eyes_animation);
    AnimationDrawable readingAnimation =(AnimationDrawable) willEyes.getBackground();
    readingAnimation.start();

    ImageView willMouth = (ImageView) getView().findViewById(R.id.willMouth);
    willMouth.setAdjustViewBounds(true);
    willMouth.setBackgroundResource(R.drawable.will_mouth_animation);
    AnimationDrawable mouthAnimation =(AnimationDrawable) willMouth.getBackground();
    mouthAnimation.start();
}

Basically you have to find the view, set the background resource, prepare the animation and start it.

Memory problems

If you are careless it’s easy to run out of memory using this method, cause you are working with lots of bitmaps. It’s strongly recommend to use custom drawables for each pixel density. Each pixel counts especially on low-level devices.

Be careful with Roboguice and creating and destroying Activities/Fragments that has animations.  When finishing an Activity/Fragment that extends a RoboActivity/RoboFragment it’s not destroyed immediately, it has to wait for a Finalizer to be garbage collected. It will occur but It will not fast, even if you call the garbage collector. So if you create a lot of views you will face a problem.

For this game we only used Roboguice to inject views, so we decided to implement the view injection by ourselves in some kind of framework we are building for future applications (that function it’s very few code indeed). We will release it soon, when it is a little bit more mature.

Underlining views with custom shapes, overdraw performance

After the post of underlining views and custom drawables in android some people ask me about performance. So let’s talk about it.

So after a little research about performance I found this post http://www.curious-creature.org/2012/12/01/android-performance-case-study/ talking about performance and overdraw. I recommend read the post, but in resume we refer to overdraw as the number of times the GPU has to draw the screen for each component. You can active it in the Developer options as Show GPU overdraw.

It will color your screen this way:

Wordpress overdraw

  • No color means there is no overdraw. The pixel was painted only once. In this example, you can see that the background is intact.
  • Blue indicates an overdraw of 1x. The pixel was painted twice. Large blue areas are acceptable (if the entire window is blue, you can get rid of one layer.)
  • Green indicates an overdraw of 2x. The pixel was painted three times. Medium-sized green areas are acceptable but you should try to optimize them away.
  • Light red indicates an overdraw of 3x. The pixel was painted four times. Small light red areas are acceptable.
  • Dark red indicates an overdraw of 4x or more. The pixel was painted 5 times or more. This is wrong. Fix it.

In the other post we put this drawable:

Layers 2


And we can see it has a 2x overdraw (green color) because of the 2 layers:

2 x overdraw

But we can fix that by changing the drawable for not to overlap between the layers.

layers_no_overlap_1


Now we have a 1x (blue) overdraw:

1 Overdraw

Because now the layers do not overlap it doesn’t matter which layer goes on top of another.

The main drawback of this method is that you only can use if you know beforehand the height of the drawable.

If you don’t know the height you will have to use a 9patch button or keep it like we put in the previous post paying the overdraw cost.

In our case we would use the drawable method in development to be able to change the drawables fast, and change to 9patch button if needed.

Example with 3 layer

This drawable is compound of 3 layers (see this post if you want to see the xml).

3 Layers example

The overdraw of this view is 3x:

3xoverdraw

Changing the drawable we can reduce it to a 1x factor:

Layers no overlap 2


With the new xml the overdraw remains 1x (blue).

New overdraw for 3 layers

Underlining views, custom drawables in android

Edit:
In this post we talk about the performance of this method.

Sometimes we want to underline a view (a TextView or a Button), just to show the user that it’s active, or any other reason.

To achieve this we use custom drawables. In this case we use a layer-list.

The first element of the layer list is the base, and every item we put it’s a layer that goes on top, let’s try with an image, and it corresponding xml:

Layers

And here is the drawable. We can see that the first element is the base layer:


                <!-- layer 1-->
            
            
                <!-- layer 2-->
            
            
                <!-- layer 3-->
            
            
                <!-- layer 4-->


And now to achieve the effect we must know the bottom, top, right and left properties of item. They are similar to the margin property, but the are relative to the view.

So if we set the bottom of the second layer to 3dp (for example) we will be able to see 3dp of the layer below in the bottom. Here is an example:

Layers 2


Now we only need to assign the drawable to the background property of our view (ImageView, Button, etc).

Here is how it came out in my app:

Bar

Other effects

We can put lines in top and bottom at the same time:

Top and bottom


We can also put a line in one (or both) sides. Here we have a line in the left.

Left


We can use more that 2 layers to achieve new effects. Here we use 3 layers to get this effect.

Explaining 3 layers
3 Layers example